Monday, March 25, 2013

Small round knitted pillow.


Now, I would be lying if I said that this project turned out EXACTLY how I originally intended... I wanted to make something out of my crushed velvet yarn that I made last month.  At first, it was going to be a knitted pouffe or ottoman, but on realising that I didn't have enough yarn, I pulled it back.  (I just couldn't face cutting metres and metres of fabric again.)

Then it was going to be a floor pillow, but again, after knitting nearly all of the yarn, I realised that I didn't quite have enough for that either. So this is the pattern for my knitted round pillow...  Let's call it a miniature prototype for the lovely big knitted pouffe I plan to make at some point in the future...


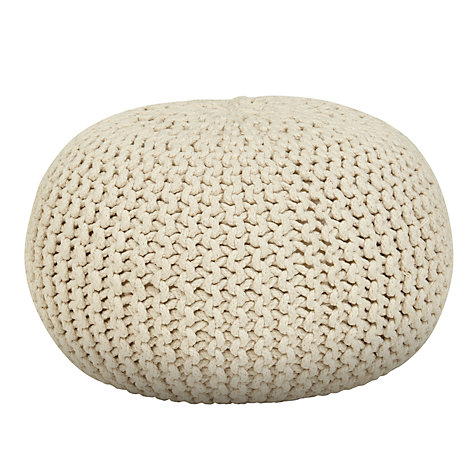
Buy Rope Pouffe Online at johnlewis.com
It's inspired by this fabulous Rope Pouffe from John Lewis


Many of the patterns for this kind of cushion usually involve knitting one long length of garter stitch and then gathering up the sides.  I really didn't want that amount of excess fabric, so I worked mine using short rows or partial knitting.


The yarn that I made from crushed velvet fabric was really lovely to work with.  It has a nice stretch to it, which made it a joy to knit with and, as it was so thick I was able to make this in just a few hours.  That's my kind of project!


Having made this, I now know exactly how I'm going to be making my big pouffe... this year, maybe...

Anyway, here's the pattern that I designed.

Pattern for a small round pillow.

Mine is knitted using size 15mm circular needles I could have made it on long straight needles, but circular needles gave me the advantage of being able to fold my knitting in half to get an idea of how my knitting was progressing.  You want the stitch to be quite tight so that the inner pillow doesn't show through too much.

The gauge of my yarn is 5.5 stitches and 8.5 rows = 10 cm square or 3wpi.
You could either make your yarn out of jersey fabric, or ply several yarns to get the desired thickness.

Using size 15mm circular needles , cast on 18sts, starting with a long tail of yarn, which will be useful for gathering later.

Row 1: k15, wrap 1 and turn.
Row 2: k12, wrap 1 and turn.
Row 3: k8, wrap 1 and turn.
Row 4: k4, wrap 1 and turn.
Row 5: k11 to the end, picking up the wraps and knitting together with the wrapped stitches. (For reference, the wrapped stitches are stitches 5 and 9.)
Row 6: k18, to the end, picking up the wraps and knitting together with the wrapped stitches. (For reference, the wrapped stitches are stitches 12 and 16.)

Repeat these 6 rows until your knitting will loop around to form a circle when it's lightly stretched.


For guidance, my cushion used 18 pattern repeats or 108 rows.

Using the long cast on tail, gather up 1 of the side seams to loop the cushion around into a circle.

Crochet the cast on and cast off seams together to about 3/4 of the way down.

Use a crochet hook to further close the first gathered centre if required.
Turn the cushion to the right side. Insert your cushion pad or stuffing.

Continue sewing the seam together, with a crochet hook. Finish by gathering up the second side seam, closing the hole as much as possible.

Some of my other knitting blog posts


Virtually No-Sew Knitted Hearts

Giant Rainbow Pillow Knitting Pattern

Bohemian Wreath Knitting Instructions

Craftmehappy Joyful Loop Stitch Wreath Base

How to Knit Curlicues or Spirals
----------
Please be sweet and share the love. Leave a comment, subscribe to my YouTube channel, like my Facebook page for regular updates or follow me on Pinterest,  Bloglovin' or Instagram


Thursday, March 14, 2013

Shrink Plastic buttons


Last week I finished off another felted hanging storage bag and I need an awful lot of buttons to sew into the middle of my flowers.  I was going to buy some, but I thought it might be more fun to try to make some out of shrink plastic instead.  I absolutely LOVE shrink plastic - it's one of my favourite things to play with, so this would be the perfect opportunity to have a play and design exactly what I wanted at the same time.

As I wanted so many, I used my Cuttlebug Machine to cut out the shapes, but I imagine any die cutting machine would do the trick.  I could have cut my shapes with scissors, but it would have taken many hours longer to make the number of buttons I wanted.

Materials needed
  • Die cutting machine or scissors to cut the shrink plastic.
  • Cutting dies. Again, not essential. For reference my shapes started off at about 4cm wide and shrank down to about 1.5cm wide.
  • Chalks for dusting - Light coloured pencils would work too.
  • VersaMark watermark stamp pad if using dusting chalks.
  • Rubber stamp if using a Versamark ink pad.
  • Light coloured Sharpie pen for optional decorative touches.
  • Crop-A-Dile or hole punch
  • Clear embossing powder to protect the surface colour. An alternative varnish or glaze would also work.
  • Heat gun if you're using embossing powder.
  • Oven.  You could also use the heat gun to shrink your shrink plastic, but I always find an oven far more consistent and much easier.


This is the first time I've made buttons using my Cuttlebug, so I wasn't really sure which ones would work best.
 

The shapes weren't cutting out perfectly to start off with, so I put through an extra sheet of cardstock with my plates and die, which thickened my cutting sandwich enough to get a nice clean cut.


I marked my button holes in pencil and then used my Crop-A-Dile to cut out the holes.  To start off with, I used the smaller 1/8" hole, but after shrinking my first batch I started using the larger 3/16" as the smaller hole was just too small to be practical.


To shrink them I set the oven to 175 degrees C (or 350 F) and just watched and waited.  This is my favourite part of using shrink plastic!  As they are quite small they only take a couple of minutes in the oven.  I just stand excitedly, watching them curl up and roll around on the baking tray and then they suddenly gain their shape again and settle back down on the tray.  Small things!

Above are the shrunken buttons next to their originals to show just how much they shrank by.  Those holes are tiny...  I'll be sewing these ones on with a beading needle!

After shrinking the first ones and playing with the results, I decided to stick with just the 4 Cuttlebug die cutters. The Creatables flower was just too small to put 2 large holes in, as was the Sizzlits star.  The Creatables poinsettia was still a nice size, but when it shrank down it became too weak at the base of the petals and would break very easily, so I discounted that one too.


When you colour shrink plastic and then shrink it, the colour always becomes darker and more intense.  As I wanted very pale colours, I used my Dovecraft Shimmer Chalks.  I chose only the lightest pinks and greens and dusted over the frosted side of my white shrink plastic to get just a hint of colour. I then shaded the edges with slightly darker colour. To get the flower patterned ones, I stamped onto the shrink plastic first with my VersaMark watermark stamp pad and then rubbed over the whole button with my chalks. This gives a lovely two-tone effect when the chalk brushes over the Versamark ink.


Here they are before shrinking.  The heart one has been lightly dusted with pink powder and then dotted with a light pink Sharpie pen.


...and after shrinking.


To protect the colour and make them a little more hard wearing I embossed them with 2 layers of clear embossing powder.  Unfortunately the embossing powder has yellowed the colour slightly, but I can live with that.


I accidentally used some holographic embossing powder at one point, which was interesting, but not exactly the look I was going for.


I love the ceramic look you get with putting a glaze over the white shrink plastic buttons.  These buttons are made out of frosted shrink plastic, but they are still quite plastic looking and for some reason, the shrinkage wasn't nearly as even as with the white shrink plastic - my squares are now rectangles and my circles are ovals... hmmm


These buttons are hopefully going to be sewn onto a storage bag next week, but they could also be used to embellish cards, scrapbook layouts and many other decorative objects.  I'm not sure just how well they'd stand up to the rigours of regular laundering.  I'll have to run a few tests and let you know...

Similar Related Blog Posts


DIY Shrink Plastic Stitch Markers

----------


Please be sweet and share the love. Leave a comment, subscribe to my YouTube channel, like my Facebook page for regular updates or follow me on Pinterest,  Bloglovin' or Instagram