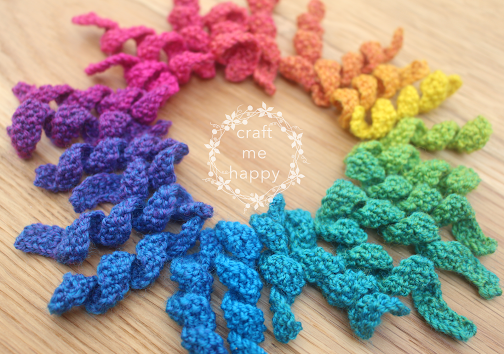
Last month I shared how I made the knitted fur base for my Joyful Wreath. My goal is to try to post one repeating wreath decoration a month, with a final reveal in December.
This month I want to share how to make these knitted spirals. I can think of lots of different uses for them than just decorations on a wreath -
- A bunch of them would make a cute alternative to a pom pom.
- You could knit really long ones as streamers to decorate a craft room or child's bedroom.
- You could cast them on in the middle of your project for interesting texture on a bag, cushion, or child's jumper.
- They would make cute hair locks on a handmade doll.
- You could even knit a bowlful of them and pretend that you have multicoloured fusilli pasta!
Full Disclosure - This post contains affiliate links to products similar to ones that I purchased myself. If you purchase via the links, I may receive a small percentage of the purchase price at no cost to you. Any income from my blog goes a small way towards funding future blog posts.
I handspun the yarn for the spirals using just cyan, magenta, and yellow that I blended using my mini wool combs.
Here's the final yarn. The white knots denote the beginning and end of each individual colour so that they can be easily separated out.
How to Knit Curlicues
The following is more of a recipe than a knitting pattern. I'd love to see people knitting them in a wide range of yarn weights and lengths, and not be limited by my choices.
My handspun yarn is probably equivalent to a UK 4ply (US fingering yarn). I'm using size 2.25mm needles - (I love these 40cm circular needles as they make this fast project, even more portable). I would recommend using a slightly smaller needle size than recommended for your yarn, as it gives a neater finish to the spirals.
I cast on between 45 and 54 sts for my curlicues - but of course, you can cast on as many as you want depending on your yarn and how long you want them. Just remember that the spiral will shrink by a third when you cast off.
I chose to cast on a multiple of 3 stitches as this made casting off easier later, but you don't need to be overly strict about it.
Work 3 rows in UK moss stitch (US seed stitch).
Decrease AND cast off as follows. (Work all stitches as tightly as possible) -
K1, *P2tog, pass the first stitch on the right needle over the second stitch to cast off, k1, pass the first stitch on the right needle over the second stitch to cast off, repeat from here* to the end, finishing on a P2tog Pull the yarn through the final stitch.
I knitted 24 little spirals in slightly varying lengths - the variations add to the joyful randomness of it all.
I was originally intending to arrange my wreath motifs in random colour order, but seeing them arranged in spectrum order is extremely pleasing! I may have to rethink it...
Hopefully, by the end of next month, I'll have another wreath decoration to share with you. I haven't quite decided what it's going to be yet so watch this space!
Related Posts
 |
| Knitting the Loop Stitch for a Curly Wreath Base |
 |
| Small Round Knitted Cushion Pattern |
 |
| Virtually No-Sew Knitted Hearts |
 |
| Bohemian Wreath Knitting Instructions |
 |
| Giant Rainbow Pillow Knitting Pattern |
 |
| Simple layered 3-dimensional needle felted flower tutorial |
 |
| Rainbow Decoration Knitting Pattern |
 |
| Needle Felted Beads or Balls |
----------
Please be sweet and share the love. Leave a comment, subscribe to my YouTube channel, like my Facebook page for regular updates or follow me on Pinterest, Bloglovin' or Instagram


What a fantastic and versatile knitting tutorial! I love how you've provided so many creative ideas for using these knitted spirals beyond wreath decorations. I've featured your post on Crafts on Display here: https://craftsondisplay.com/knitting/how-to-knit-spirals-47177/
ReplyDeleteAll the best,
Do you have a tutorial video for the bind off? I do better seeing it.
ReplyDelete